HARNESS
SETTING :
we have 2 solution of harnesses:
The PSF system
the ABM sistem
The
PSF system
designed by PER IL VOLO in 1996 is now known like classic standard and
used by the most important paramotor manufacturers in all the wolrd.
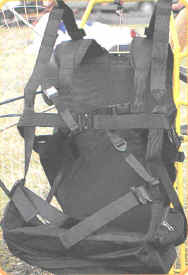
It is made of many parts
|
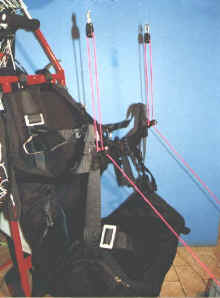
On the left side drawing
: The green parts
hold the engine on the shoulders
while standing up.
The red
parts hold the pilot while in flight by the
carabiner
The
black parts belong to the rigid frame, in trimming the
flight they cancel the torque effect of the
prop.
|
|
Thank to this kind of balance the
wings is stable and the pilot at ease.
The smooth hooking of the
wing allows an active piloting to the expert pilot
HARNESS
SETTING |
It
is better to do the very first setting by
hanging the harness with the help of ropes (to a tree or a balcony
etc.) so to simulate the action of the wing braces
(bear in mind that braces are never exactly perpendicular, instead, they tend to pull
outside). This
setting is for a 140/210 lb. or 63/78 in. pilot. A variation of few inches
is enough in case of heavy pilots. |
| Do start by
lengthening the belt (C) by
the buckle (5), in order to avoid to interfere with other
settings. |
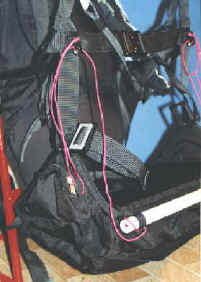
| Shoulder-paddings
- The pilot standing
up, the weight of the engine must be on the Green
paddings (A);
If they are to short they lean on the seat hampering the movements.
It must be possible to shift the seat towards the back,
without
any effort
The adjustments must be done by the buckles(1) e
(2). |
|
 |
The cross belt
is to avoid the slipping of the engine off the shoulders while inflating
the wing.
Thigh straps (3) - you
get the right fastening when you can seat easily, without the use of the
hands..
If they are too loosen you get hard to seat but you have an easier
run.
If too tight you get hard to slip back to the seat after taking
off. |
The hooking point (4) and its
lengthening
(B) must be adjusted following the pilot's size.
Each pilot will choose the the adjustment in order to
get the carabiner-catch to better suit his needs in flight as well as on the
ground
The horizontal length
(C) allows the adjusting the incidence of the axis of the engine
thrust, hung with the engine off, the thrust
of the prop must be horizontal or few degrees positive (max 10°).
This length is connected to the
pilot's weight .
The spacer bar (D) pushes
away the pectoral from the pilot's chest and makes easy to seat.
|
|
The
pectoral (E) fasten the harness as in the
free flight.
The adjusting of the buckle (6)
allows to control the stability, the pectoral must be tighten to eliminate
the clearance.
The anti-torque belt
(F) counterbalances the torque of the engine,
the adjustment is made by the buckle (7) and
(8).
The buckle (7) can be
adjusted even while in flight. |
|
The standard settings are the following :
Pilot's
weight / height
|
HANG
POINT |
higher
belt = distance from
the base of the carabiner-catch to the center
tube of the frame |
space-bars |
| Kg / cm |
lb./in. |
B |
C |
D |
| 60 / 170 |
130/67 |
M harness = high
L harness = low |
28cm |
M size = 27 cm |
75 / 180 |
165/70 |
high |
31 |
L size =
30 cm |
| 90 / 190 |
200/75 |
high |
34cm |
XL = 33 cm |
|
WARNING
: The
size C must be 1/2 in. SHORTER on the right side. |
The harness is well adjusted when :
In flight neither the
shoulder pads (A) nor the cross-buckle (2) must be stretched.
Any part of the harness must
hamper the movement of the arms towards the high.
The paramotor weight must be hold by pilots
solders (A), While standing up the outer belt
(B+C) must not be stretched
example of the basic setting of the shoulder straps
lenght
A + 1 |
|
|
The buckles of the thigh's straps as
well as those of the pectoral must be fastened with the adjustment
outward, otherwise the belt does not lock. (removable version) 
|
|
Detail of buckles
fastening (removable version) |
|
|
the harness must be free to moove upside while standing up
(seat position follows the
thighs), or the
take-off run is hampered
by poor posture of the pilot.
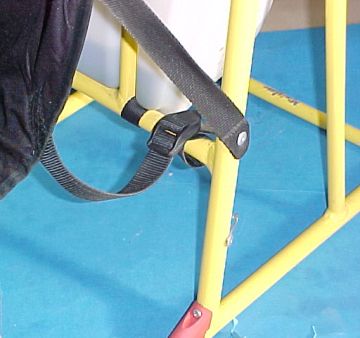
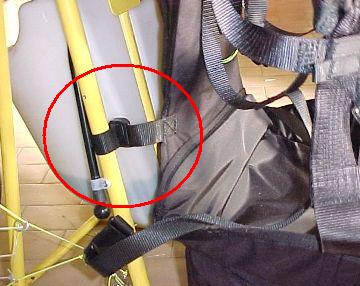
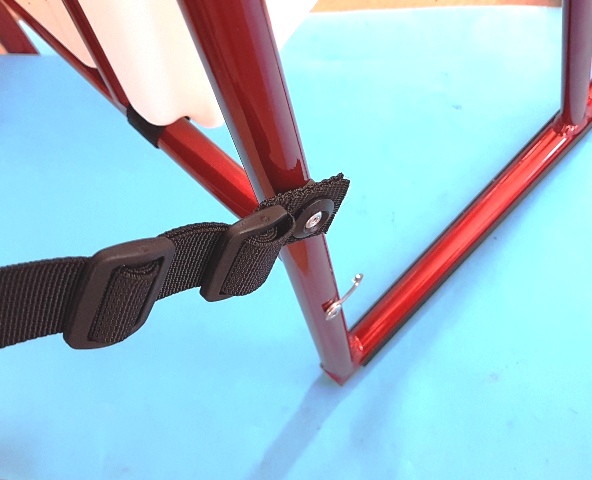
If this string is not long anought ...
...
may be better to fix it to the lateral frame tube
this solution is not the same with different harness sizes
or settings, or bar lenght, so this decision is up to you after you
set-up and try the machine on the ground.
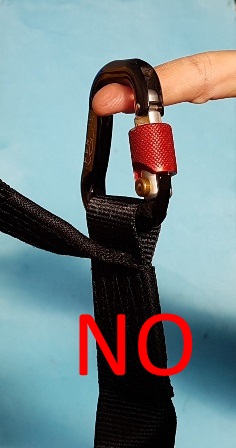
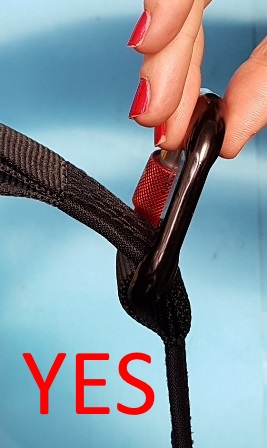
Verify the string lenght, the loop must be large anought to
permit a free mouvement up and down
be carefull, on the right side the string loop must not include the remote
choke |
 tipical for XL size harness tipical for XL size harness
 tipical for L and S size harness
|
|
how to fix the harness to the frame |
 |
 |
 The
carabiner-catch must be slipped so to have the pad-belt inward. The
carabiner-catch must be slipped so to have the pad-belt inward.
(should it unstitch, it will hold you anyway)
  |
M4 frame and harness setting
here
the harness ABM
sistem
is an evolution made from PER IL VOLO since year 2007
Thanks to the lower and pivoting
hangpoint it allows a more active piloting retaining at the same time excellent
characteristics of autostability.
If correctly set
up it is appreciated expecially by pilots with free flight experience and used
safely also by less experienced pilots.
|
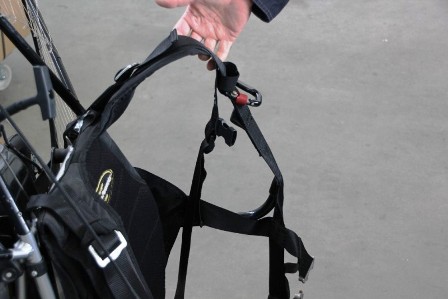
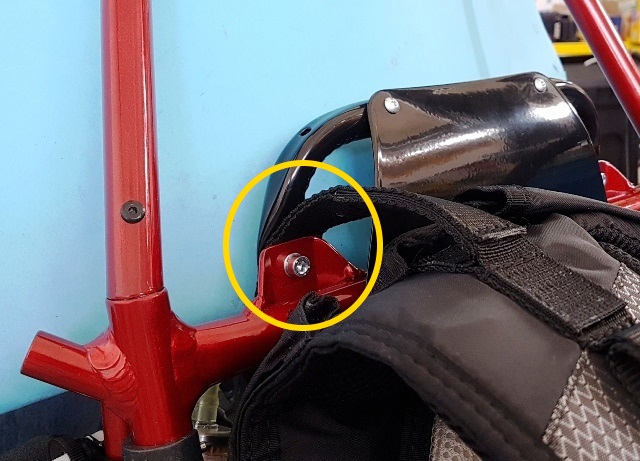
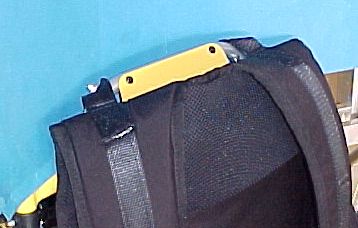
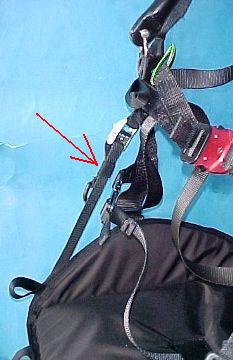
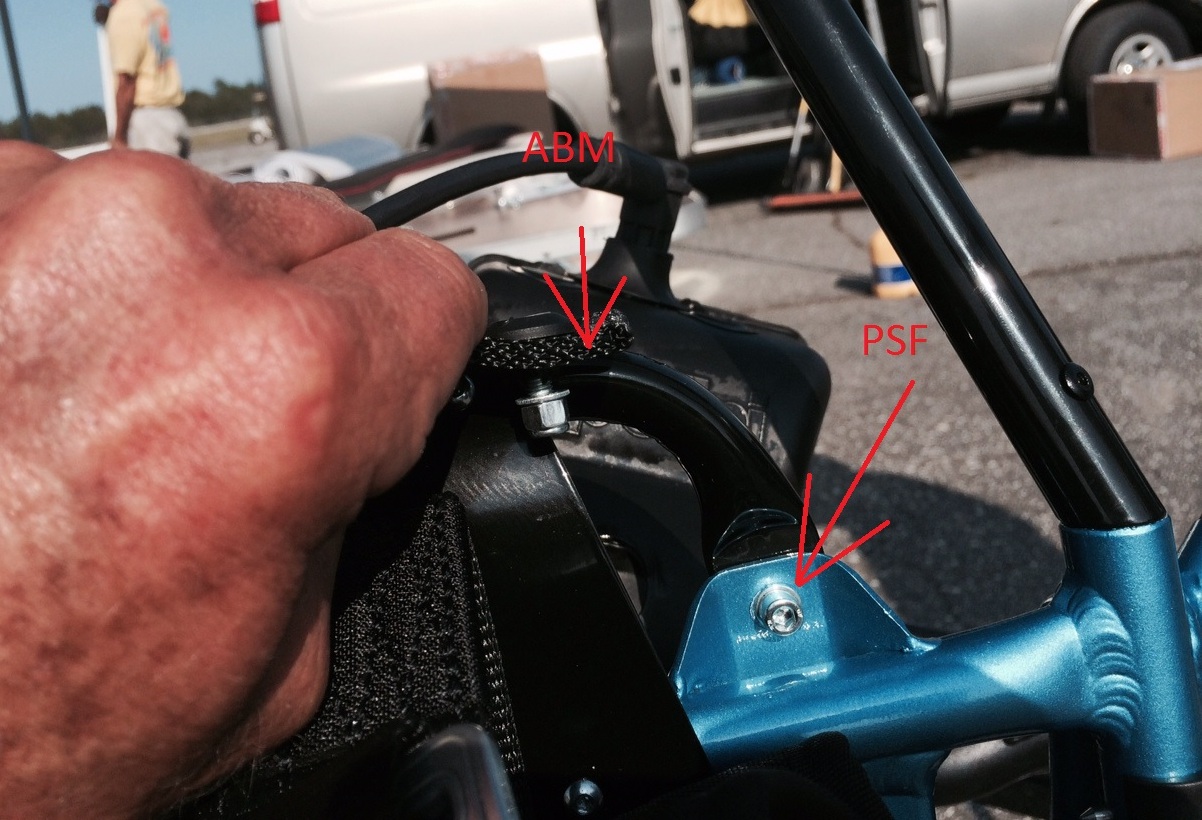
the upper streps are screwed to the frame from the
top or from the bottom, this is a personal choice |
 |
|
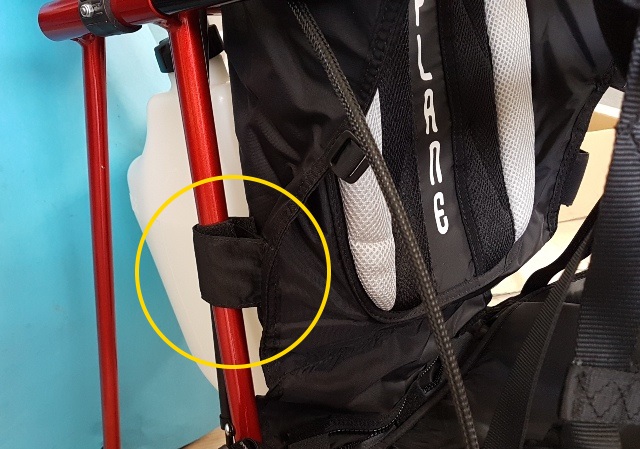
|
don’t tighten this
loop , it must be allowed to move up and down
On the right side, don't include the remote choke control |
the
basic setting of ABM harness is similar to free flight harnesses
|
leg straps
– the correct tension of the straps is obtained when the pilot can go in the
sitting position comfortably and without using his hands.
If too
loose
it
runs
better,
but
it will be difficult
to sit,
even if
too tight
it will be
difficult
slip back
into
a sitting
position
after
takeoff
|
|
The seat has two straps
in the front that have to be left loose during take off and shortened once
in flight to the pilot’s desired position |
 |
|
the
chest strap must be tightened is such a way as to limit the sideways
pull of the carabiners on the two arms (in flight, the glider pulls the
carabiners up and sideways) so as not to stress the frame. The two arms
should still be allowed to move freely up and down.
|
|
|
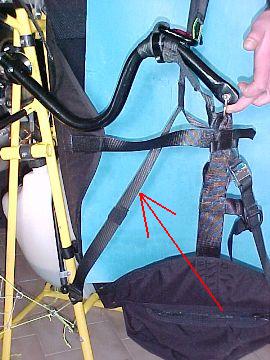
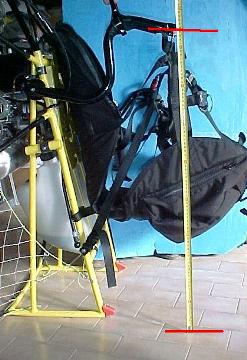
the
straps that attach to the frame (see image below) must be adjusted so
that, with the chest strap closed, the upward movement of the two
arms is limited to 85 cm from the ground (see the image on the right )
 |
 |
|
the shoulder straps
must be adjusted so that the frame is comfortably on the pilot’s back when
on the ground but become loose when in flight.
While on the ground, with the
pilot standing, it is not necessary that his back be touching the frame’s
backsupport (as in the PFS system).
By adjusting the shoulder
straps this way the pilot can moderatly move forward with his shoulders,
during the takeoff phase in which the glider picks up the weight of the
paramotor, without effecting the correct alignment of the propeller with the
ground (and so the line of thrust).
|
|
|
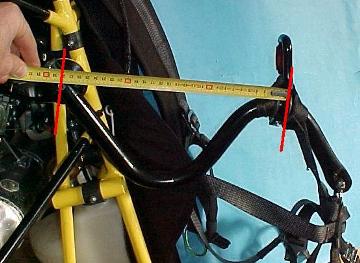
the hang points on the
moving arms allow the adjustment of the direction of the line of thrust to
the different weights of the pilots. Move forward for heavier pilots and
viceversa for lighter ones.
The right hangpoint must be
1cm less distant then the left one.
a basic setting for 80 kg pilot is :
28-29 cm dx, 29-30 cm sx
11-11,5 in. right, 11,5-12 in. left
frame 2016 basic setting for 75 Kg pilot : 30-31 cm right, 31-32 cm
left
The
measurement is done as in the image on the left. |
 |
more about the setting for light pilots
here
INTEGRATION TO THE MANUAL : FRAME 2016
HERE
FOR YOUR
SAFETY:
the suspension belt
in the
ABM
harness system also serves as a
docking security
in case of failure of metal
components and is
particularly overstretched
WE RECOMMEND TO REPLACE THIS BELT
EVERY YEAR
www.miniplane.it/shop
art.T8FB |
FOR YOUR SAFETY :
The harness
should be checked periodically by a suitably qualified person and replaced
when necessary.
Like the
glider, the harness also has a limited lifespan, on average every 500 hours
of exposure to the sun will reduce the resistance of the synthetic
materials by half.
Aerobatic
manoeuvres, improper use and landings in water can also greatly effect the
fabrics lifespan.
|
PAY ATTENTION : The harnesses
PSF and ABM are fixed on the frame in different points :
 |
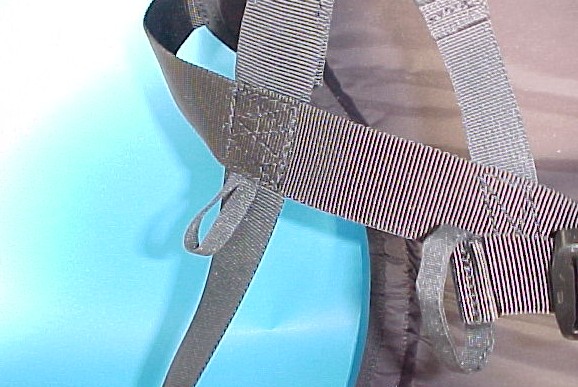
Foot-accelerator (speed system)
|
while in flight you can use the foot-accelerator .
You must pay a bit more attention when mounting the device and
when you wear the harness, in order to avoid the string to get jammed around
some belt.
We suggest you to use the double returning in order to reduce
the effort (as shown in the picture).
|
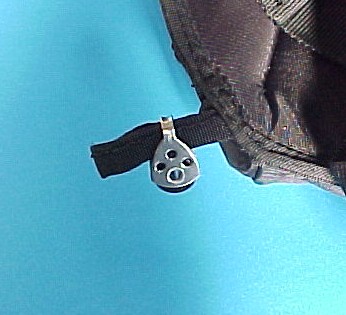
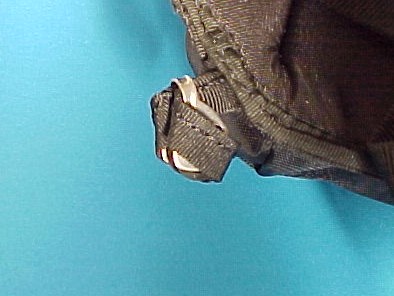
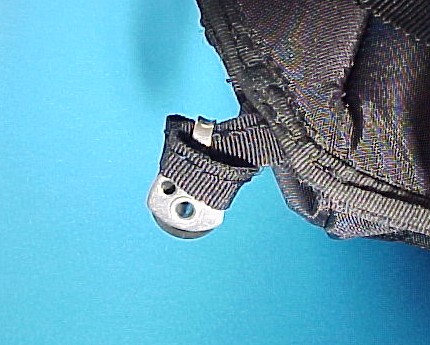
|
|
When not used, the pulleys can be put in the side pockets
|
|
|
|
|
SETTING THE EMERGENCY PARACHUTE
In the Miniplane paramotor, you can mount an emergency
parachute (emergencies).
For performance and quality please refer to the
manufacturer's manual
To avoid the moving of the bond rope do fix it by
strap ribbons.
As there insn't "the best solution"
on the following table we describe
advantages
/ disadvantages of each possible solution
kind of
setting |
benefits |
impediments |
lateral
To the side vertical harness belt. in this case the rope must
pass under the pilot's arm from the launching side |
Fixing it to the right
side it counterbalance the prop torque |
You can only launch it by
one hand (the right one), better if you first leave the control handle.
The
gas handle could hamper the proper launch |
ventral
In ventral position by a special casing. It can be a short one,
straight to the spring-catches (4), or loose to the points (5)
pay attention please, our EM 11 and em12, must be
hang to the carabiners without any modification (prolongments) to the risers |
Less
impeding while maneuvering With a short
rope you can launch either with the left or with the right hand |
The short rope must be
hooked
to the spring-catches in order to get out of the harness - each time you
sit on the harness may be dangerous in case of
water landing |
|
over the head
fixed to the frame yust back to the pilot head
pay attention please, our EM 11 and em12, must be
hang to the carabiners without any modification (prolongments) to the risers |
very simple
assembling,
With a short
rope you can launch either with the left or with the right hand |
in case of a
deep spiral because the big centrifugal force may be difficult to find the
launch handle |
lateral
aircone |
You can operate it
by both hands or hand-launching by hand, using the right hand |
weight and dimensions
bother, in flight as well as on the ground |
aircone cylindrical
under the tank |
any burden for the pilot
good aerodynamics
low center of gravity |
weight |
kind of setting
|
benefits
|
impediments
|