MAINTENANCE TIMETABLE
DEADLINES |
INSPECTIONS |
TO
REPLACE |
| DURING
AND AFTER RUNNING-IN |
by
sight all the screws and the seal of the motor head
after the removal of the air conveyer. |
|
| before each engine starting |
remember the check list, see also : engine starting |
after first
5 hours |
 all
the screws (remember the 4 screws inside the air
conveyer) > all
the screws (remember the 4 screws inside the air
conveyer) >
|
| after first 10 hours |
remove the gear oil, check and clean the
magnetic tap for metal parts |
refill with 50 cc of 80-140 grade oil |
every 25
hours |
|
|
deadlines |
TO
CHECK |
TO
REPLACE |
every 50
hrs.
|
intake reeds
(elasticity
and sealing)
cleanliness around the clutch bell
cleaning and/or decarbonizing of the
head and piston
piston ring sealing (compression
test)
-
spark cap
|
spark
plug
-
gear oil - 50 cc of 80 140 grade gear oil
-
piston ring, (following the result of compression test)
|
every 100
hrs. |
-
crankshaft
sealers
-
cranckshaft roller bearing (tollerance
and noise)
clutch diameter and clearance
-
string,
springs and plastic parts of the starter system
-
roughness and bore of the cylinder.
May be necessary a polishing and a new piston with
the adequate size
|
|
every 150/200
hrs. |
|
piston
-
cranckshaft sealers
-
cooling
fan
|
every one year
(even if the engine has not been used) |
gas pump and/or carburetor
diaphragms
-
crankshaft
sealers
all plastic parts
-
wood propeller
|
|
DEADLINES |
INSPECTIONS |
TO
REPLACE |
LOCKING
TORQUES
bolts
and knots |
Metric |
metric wrench (mm) |
torque
(N.m) |
torque (lbf.in)
|
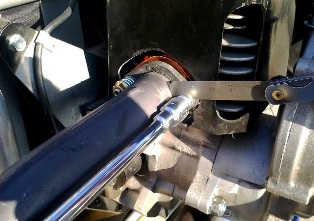
motor
cylinder-head studs |
M6
|
hexagon
10 |
9
do check for the symmetric fastening. |
80
|
|
prop |
M6
|
Allen
5 -
hexagon
10
|
9 / 11
go to
prop
setting |
80 - 100
|
engine
elastic mountings
|
M6
|
Allen 4
|
10
special
directions :
do not twist the mountings while screwing, do not use screws longer that
the standard ones, the screw thread must not enter more than 6 mm |
90
|
|
M8
|
hex
13 or Allen
6
|
15
special
directions :
do not twist the rubber mounting while screwing, do not use screws longer that
the standard ones, the screw thread must not enter more than 8 mm .
|
140
|
5
mm fastening for diaphragm carburetor and plastic flange |
M5
(Black anodized aluminum)
|
Allen
4 or hex 8 |
4
|
|
|
crankshaft nuts (clutch and ignition flyweel)
|
M 10 x 1,25
|
hexagon
wrench 17
|
35
right screw thread
|
330
|
|
spark plug
|
|
|
please refer to manufacturer manual (remind the 2 mm
washer, use 2,5 or 3 mm washer with very poor octan number )
|
|
|
muffler
flange |
M6
|
hexagon
wrench 10
|
hand
fasten and stops 2 mm before the compression of the spring (see the
instruction at end of this table )
|
|
engine mountings |
|
|
|
|
|
miscellaneous |
4 mm
|
attention:
reduce by 50%
with screws made of aluminum or
short threads
on aluminum,
reduce by 60% with
screw on plastic
|
2,5 - 3
|
|
|
miscellaneous |
5 mm
|
4 - 5
|
|
|
|
6 mm
diameter
|
9 - 11
|
|
|
|
8 mm
diameter
|
20 - 24
|
|
for
each bolt/nut you can use 1 or 2 drops of medium
strength
screw glue |
instructions for mounting the
muffler flange :
NOT tighten
the nuts until the end,
do not compress the
springs to the end !
otherwise it will
deform permanently
losing
elasticity
use a spacer, let 0,5 mm space between each wire
of the spring |
 |
Spare
parts main features
spark
plugs |
NGK B9ES
NGK B9EG
or similar |
for low temperatures |
NGK B10ES
NGK B10EG
or similar |
for high temperatures |
starting
string |
Polyamide
3,5 mm, length 110 cm |
| net
straining rope |
coated Kevlar
1,3 mm |
| gas pipe |
6mm 55cm, 4mm 20 cm
we strongly advise the use of original spare parts |
| gas filter |
paper filter
porosity of 20
micron porex filter inside
the tank |
gas
wire |
1,2
mm |
safety
gas wire (metallic gas handle before 2004) |
2 mm
o 1,2 mm |
original parts :
shop.miniplane.it
Other features on the miniplane
web page
Diaphragm
carburetor maintenance
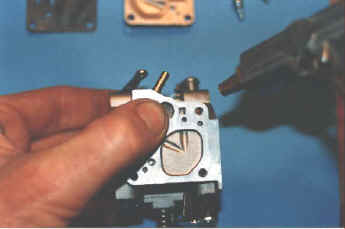 The
diaphragm carburetor is provided with an internal filter that may get blank
and cause carburetion problems that shows with power losses
The
diaphragm carburetor is provided with an internal filter that may get blank
and cause carburetion problems that shows with power losses
To clean it it is compulsory to
open the carburetor from the fuel entering side. In order to do it you must
remove the aluminum lid held by four screws
You do clean it by a spout of
air or by a fuel wet soft brush.
Do not remove the filter, clean
it while leaving on its seat.
Do pay attention
to cover with your finger about half of the filter housing, as shown in the
picture, it may slip out.
For settings and modifications go to carburation
